
Should I Buy an Arduino Uno or a Nano?
Buy the Uno if you’re a beginner following tutorials or using shields. Buy the Nano if you need a compact board for breadboard prototyping or a finished project where space matters. Both use the same ATmega328P chip, run identical code, and cost under £7 from Kunkune. The right choice depends on your project, not the board’s capability.
This guide compares every difference that actually matters — size, pin layout, USB connector, shield compatibility, and practical use cases — so you can pick the right board without overthinking it. Both boards are available as affordable compatible versions from Kunkune, shipped from Oxfordshire and dispatched within 1 working day.
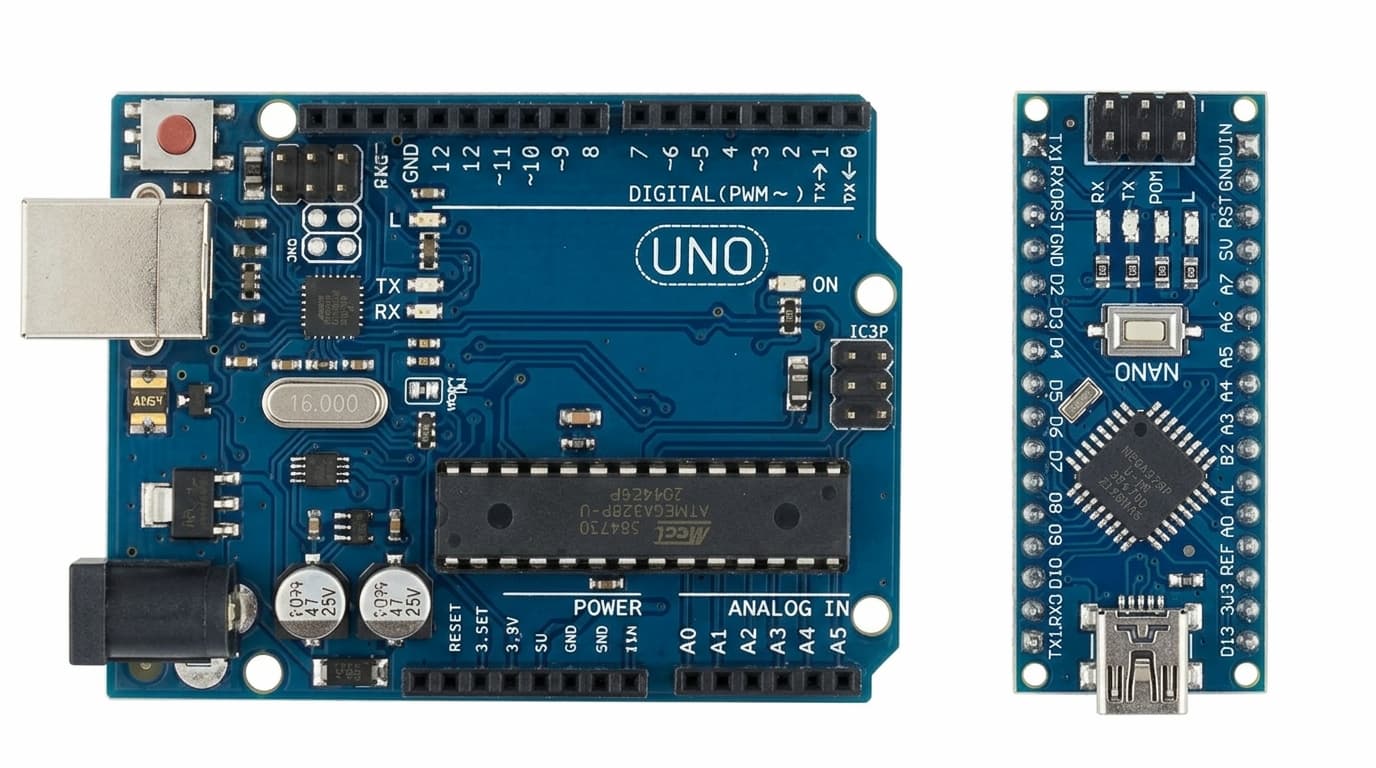
Arduino Uno compatible board and Arduino Nano compatible board side by side
What Do the Uno and Nano Have in Common?
More than they have different. Both boards share the same microcontroller (ATmega328P), the same clock speed (16 MHz), the same flash memory (32 KB), the same SRAM (2 KB), the same EEPROM (1 KB), and the same operating voltage (5V). Code written for one runs on the other without any changes — the pin numbers, functions, and libraries are identical.
Both boards use the Arduino IDE for programming, support the same libraries, and have the same processing power. If you write a sketch on an Uno, you can upload it to a Nano (and vice versa) by simply changing the board selection in Tools → Board. The compiler produces the same binary for both.
This means the choice between Uno and Nano is never about capability — it’s about form factor, convenience, and what your project physically needs.
How Are They Different in Size?
This is the biggest practical difference. The Uno measures 69 × 54 mm — roughly the size of a credit card. The Nano measures 45 × 18 mm — about the size of your thumb. The Nano weighs 7 grams; the Uno weighs 25 grams.
The Nano’s compact size means it plugs directly into a breadboard, straddling the centre gap with pins accessible on both sides. This makes it brilliant for breadboard-heavy prototyping — the board becomes part of the circuit with no jumper wires needed to reach the pins.
The Uno is too wide for a breadboard. You place it next to the breadboard and run jumper wires between the Uno’s header pins and the breadboard rows. This is fine for learning — the extra space makes it easier to see what’s connected where — but it takes up more desk space and requires more wires.
What Are the Pin Differences?
Both have 14 digital I/O pins (6 with PWM) and share the same pin numbering. The only pin difference: the Nano has 8 analogue inputs (A0–A7) compared to the Uno’s 6 (A0–A5). The two extra analogue pins on the Nano (A6 and A7) can only be used as analogue inputs — they cannot function as digital I/O.
For most beginner projects, 6 analogue inputs is more than enough. The extra two on the Nano are useful if you’re reading many analogue sensors simultaneously — but that’s an uncommon beginner scenario.
What About the USB Connector?
The Uno uses a USB-B connector (the square printer-style plug). The Nano uses Mini-USB. Both carry data and power. USB-B cables are bulky but robust and hard to break. Mini-USB cables are smaller but the connector is more fragile and less common now that most devices use Micro-USB or USB-C.
Most Kunkune starter kits include the correct cable for the board in the kit. If you’re buying a board on its own, make sure you have the matching cable — the board won’t work with a cable that doesn’t fit the port.
Both the Uno and Nano compatible boards from Kunkune use the CH340 USB-to-serial chip. The same driver covers both boards. If you’ve already installed the CH340 driver for one, it works for the other automatically. See our Arduino IDE setup guide for driver details.
Can I Use Shields with the Nano?
No. This is the Uno’s biggest practical advantage. Arduino shields — expansion boards for motor control, Ethernet, Wi-Fi, relays, and displays — plug directly onto the Uno’s header pins. The physical layout of the Uno’s headers matches the shield standard. You snap a shield on top, upload a sketch, and it works.
The Nano’s pin headers don’t match the shield footprint. If you want to use a shield-based component with a Nano, you need to wire each connection manually with jumper wires. This is doable but slower and more error-prone.
If you plan to use Arduino shields, buy the Uno. If you plan to wire everything on a breadboard, the Nano works just as well — and takes up less space doing it.
Which Is Better for Following Tutorials?
The Uno. The vast majority of beginner Arduino tutorials — including Paul McWhorter’s YouTube series, the official Arduino examples, and most written guides — assume you’re using an Uno. When a tutorial says “connect the sensor to pin 9” or “plug in the motor shield,” it’s describing Uno hardware.
You can follow these tutorials with a Nano by matching pin numbers, but you’ll occasionally need to adapt — especially for shield-based projects or tutorials that reference the Uno’s physical layout. For a first-time learner, the Uno removes that friction entirely.
Our getting started with Arduino roadmap uses the Uno as the reference board for all 9 steps.
Which Is Better for Permanent Projects?
The Nano. Once you’ve prototyped a circuit and want to build it into something permanent — mounted inside an enclosure, embedded in a device, or installed somewhere long-term — the Nano’s small size is a clear advantage. It fits inside project boxes, 3D-printed enclosures, and tight spaces where an Uno simply won’t go.
The Nano’s breadboard-compatible pin layout also makes it easier to transfer to a custom PCB later. Many makers prototype on a breadboard with a Nano, then solder the Nano directly into a stripboard or custom PCB for the final build.
Which Is Cheaper?
Both are inexpensive. Kunkune’s Arduino Uno R3 ATMEGA328P Compatible costs £6.90. The Arduino Nano V3.0 Compatible costs £3.90. The Nano is cheaper because it’s a smaller board with fewer components (no barrel jack, no USB-B port, no shield headers).
At these prices, many makers buy both. Start with the Uno for learning, then pick up a Nano when you build a project where size matters. Replacing either board if something goes wrong costs less than a takeaway coffee.
Arduino Uno vs Nano — Side-by-Side Comparison
| Feature | Uno Compatible | Nano Compatible |
|---|---|---|
| Microcontroller | ATmega328P | ATmega328P |
| Clock speed | 16 MHz | 16 MHz |
| Flash memory | 32 KB | 32 KB |
| SRAM | 2 KB | 2 KB |
| Digital I/O pins | 14 (6 PWM) | 14 (6 PWM) |
| Analogue inputs | 6 | 8 |
| USB connector | USB-B | Mini-USB or USB-C |
| USB-to-serial chip | CH340 | CH340 |
| Board size | 69 × 54 mm | 45 × 18 mm |
| Weight | 25 g | 7 g |
| Barrel jack power input | Yes (7–12V) | No |
| Kunkune price | £6.90 | £3.90 |
| Best for | Learning, tutorials, shields | Compact projects, breadboard builds |
| Buy Now | Buy Now |
Both boards are Arduino-compatible clones with CH340 USB chip. Prices reflect Kunkune UK pricing as of April 2026.
When Should I Buy Both?
Buy both if you plan to learn Arduino seriously. Use the Uno as your learning and prototyping board — it stays on your desk connected to your computer. Use the Nano for finished projects that need to be compact or portable. Since they run identical code, you can develop on the Uno and deploy on the Nano without changing anything except the board selection in the IDE.
This is actually the most common workflow among experienced makers: prototype on the Uno (bigger, easier to debug, shield-compatible), then shrink to a Nano (or Pro Mini) for the final build.
What About the Arduino Mega or ESP32?
If you need more than 14 digital pins or 32 KB of flash memory, neither the Uno nor the Nano will be enough. The Arduino Mega 2560 gives you 54 digital pins and 256 KB flash. If you need Wi-Fi or Bluetooth, an ESP32 board is the next step — it uses the same Arduino IDE and much of the same code. See our full board comparison guide for all the options.
Frequently Asked Questions
The Bottom Line
The Uno is the better first board — it matches every tutorial, accepts shields, and is easier to work with while learning. The Nano is the better project board — it’s smaller, lighter, cheaper, and plugs directly into a breadboard. Both run the same code and cost under £7. If in doubt, start with the Uno and add a Nano later when you need one.