
Arduino emerged as a beacon of innovation and accessibility. Born from a vision to provide students and enthusiasts with an affordable and user-friendly platform for digital creations, becoming synonymous with DIY electronics globally.
The rise of Arduino sparked a new wave of development: the emergence of Arduino Compatible Boards. These boards, while retaining the essence and functionality of the original Arduino, are often more cost-effective, making the world of electronics even more accessible to the masses.
What Are Arduino Compatible Boards?
Arduino compatible boards are microcontroller development boards that run Arduino code without carrying the official Arduino brand. They use the same ATmega chips, share identical pinouts, and accept the same shields. The main difference is price and brand name.
These boards connect to your computer through USB. You write code in the Arduino IDE software. The board then controls LEDs, motors, sensors, and other electronics. Think of them as tiny computers that follow your instructions.
Why choose a compatible board? You save money while getting the same features. Many hobbyists, students, and engineers choose compatible boards for prototyping and learning. The code you write works on any Arduino or compatible board.
What are the best arduino-compatible boards?
| Product Name | Key Feature | Link |
|---|---|---|
| Arduino Uno Compatible Development Board | Versatile & User-friendly | View Product |
| Arduino Uno R3 ATmega328P Compatible | High-performance microcontroller | View Product |
| Arduino Compatible Mega 2560 | Suitable for larger projects | View Product |
| Mega 2560 Wi-Fi R3 Arduino Compatible | Integrated Wi-Fi capabilities | View Product |
| Arduino Mega 2560 Pro Embedded | Compact & Powerful | View Product |
| Arduino Nano V3.0 Compatible ATmega328P | Ideal for wearable projects | View Product |
| Pro Mini 328 Mini 3.3V/5V | Dual voltage capabilities | View Product |
| Type-C Pro Micro ATmega32U4 | Modern Type-C connector | View Product |
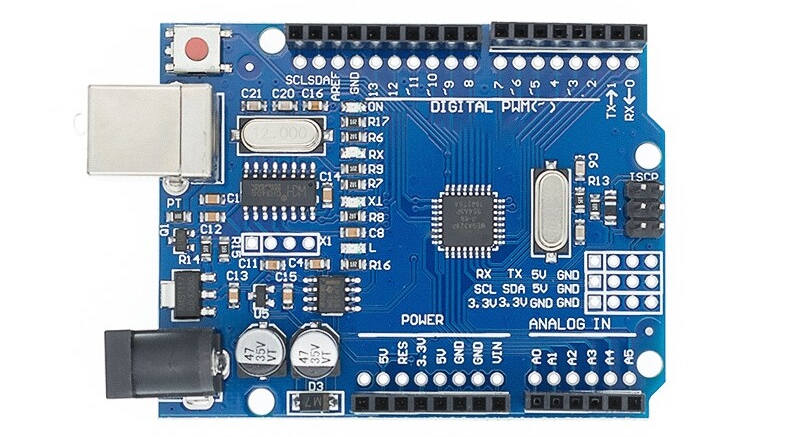
1. Arduino Uno (Compatible) Development Board
The Arduino Uno Compatible Development Board is the starting point for electronics beginners. This board uses the ATmega328P microcontroller running at 16MHz. It offers 14 digital input/output pins, 6 analog inputs, and 32KB of flash memory.
What makes the Uno special? Its design balances simplicity with power. The standard USB-B connector provides easy computer connection. Most Arduino compatible starter kits include Uno-compatible boards because they handle most beginner projects perfectly.
The Uno works with thousands of tutorial projects online. From blinking LEDs to building weather stations, this board handles it all. The ATmega328P chip runs fast enough for most applications while staying easy to program.
Key specifications:
- Microcontroller: ATmega328P
- Clock speed: 16MHz
- Digital I/O pins: 14 (6 with PWM)
- Analog input pins: 6
- Flash memory: 32KB
- Operating voltage: 5V
Connect Arduino sensors directly to the analog and digital pins. The 5V logic level works with most common sensors and modules without level shifters.
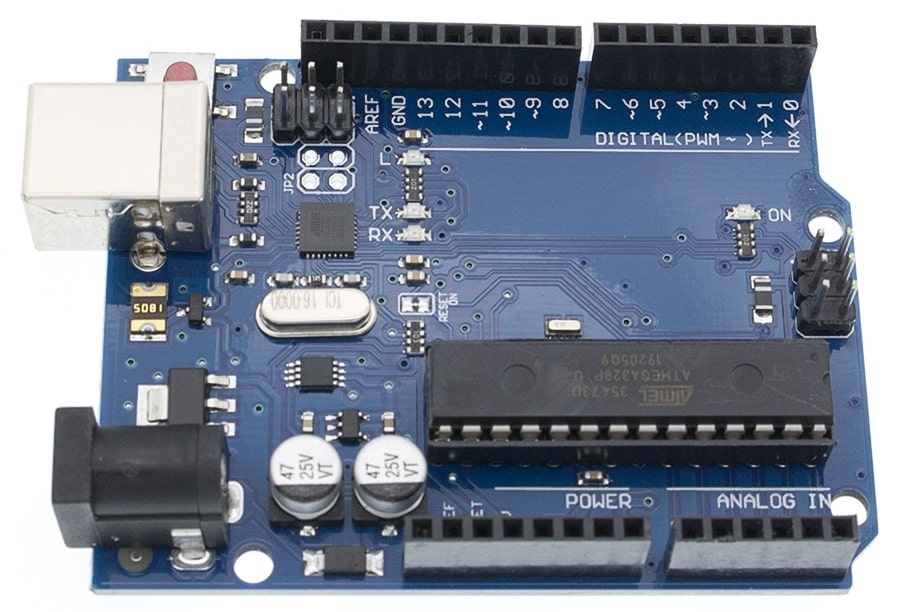
2. Arduino Uno R3 ATmega328P Compatible Board
The Arduino Uno R3 ATmega328P Compatible Board builds on the original Uno design with important improvements. The R3 revision adds extra pins and better power management. This version remains the most popular Arduino board worldwide.
What changed in the R3 revision? Arduino added SDA and SCL pins for easier I2C communication. They included an IOREF pin that tells shields what voltage the board uses. The reset circuit also got an upgrade for more reliable operation.
The ATmega328P microcontroller sits at the heart of this board. It stores your programs even when power is off. The chip handles input from buttons, sensors, and switches while controlling output devices like motors and displays.
This board works perfectly with Arduino shields designed for the R3 pinout. Shields stack directly on top, adding features like motor control, wireless connectivity, or display screens.
Technical highlights:
- R3 pinout with I2C breakout
- 16MHz ceramic resonator
- USB-B port for programming
- DC barrel jack for external power
- 6 PWM outputs for motor control
- Auto-reset for easy uploads
For more complex projects, pair this board with electronic components from resistors to transistors. The standard pin spacing accepts through-hole and some surface mount parts.
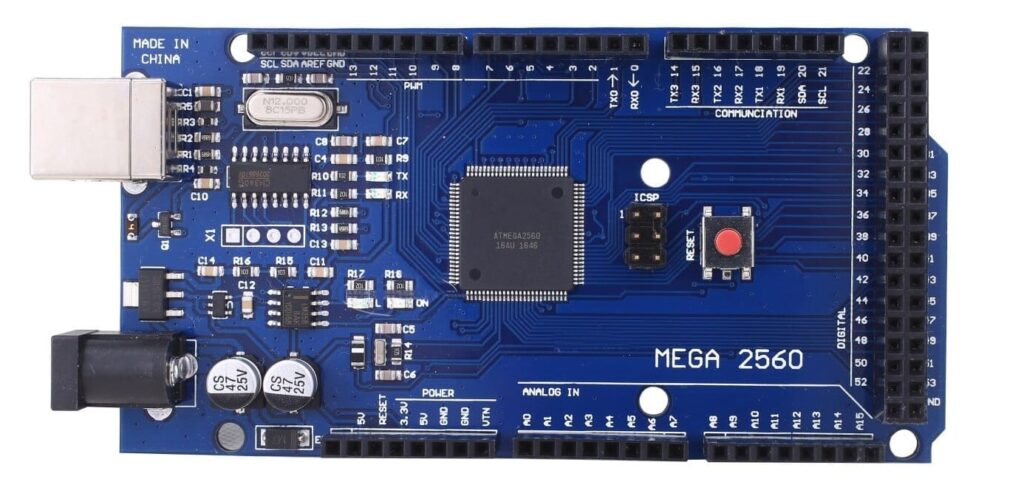
3. Arduino Compatible Mega 2560
Need more pins? The Arduino Compatible Mega 2560 delivers serious expansion capability. This board uses the powerful ATmega2560 microcontroller with 54 digital I/O pins and 16 analog inputs. Large projects that overwhelm the Uno run smoothly on the Mega.
When should you choose the Mega 2560? Pick this board when your project needs lots of inputs and outputs. Robotics projects, LED matrix displays, and multi-sensor systems benefit from the extra pins. The 256KB of flash memory also stores much larger programs.
The ATmega2560 runs at the same 16MHz speed as the Uno but processes more data per cycle. Four hardware serial ports let you talk to multiple devices at once. GPS modules, Bluetooth boards, and serial sensors can all connect simultaneously.
What can you build with a Mega 2560?
- 3D printer controllers
- CNC machine interfaces
- Large LED displays
- Multi-axis robot arms
- Home automation hubs
- Data logging stations
This board supports servo motors and shields for complex motion control. The extra PWM outputs drive multiple servos without additional hardware.
Mega 2560 specifications:
- Microcontroller: ATmega2560
- Digital I/O pins: 54 (15 PWM)
- Analog inputs: 16
- Flash memory: 256KB
- SRAM: 8KB
- Serial ports: 4 hardware UARTs
For prototyping, connect the Mega to breadboards and jumper wires. The standard 0.1-inch pin spacing fits most prototyping accessories.
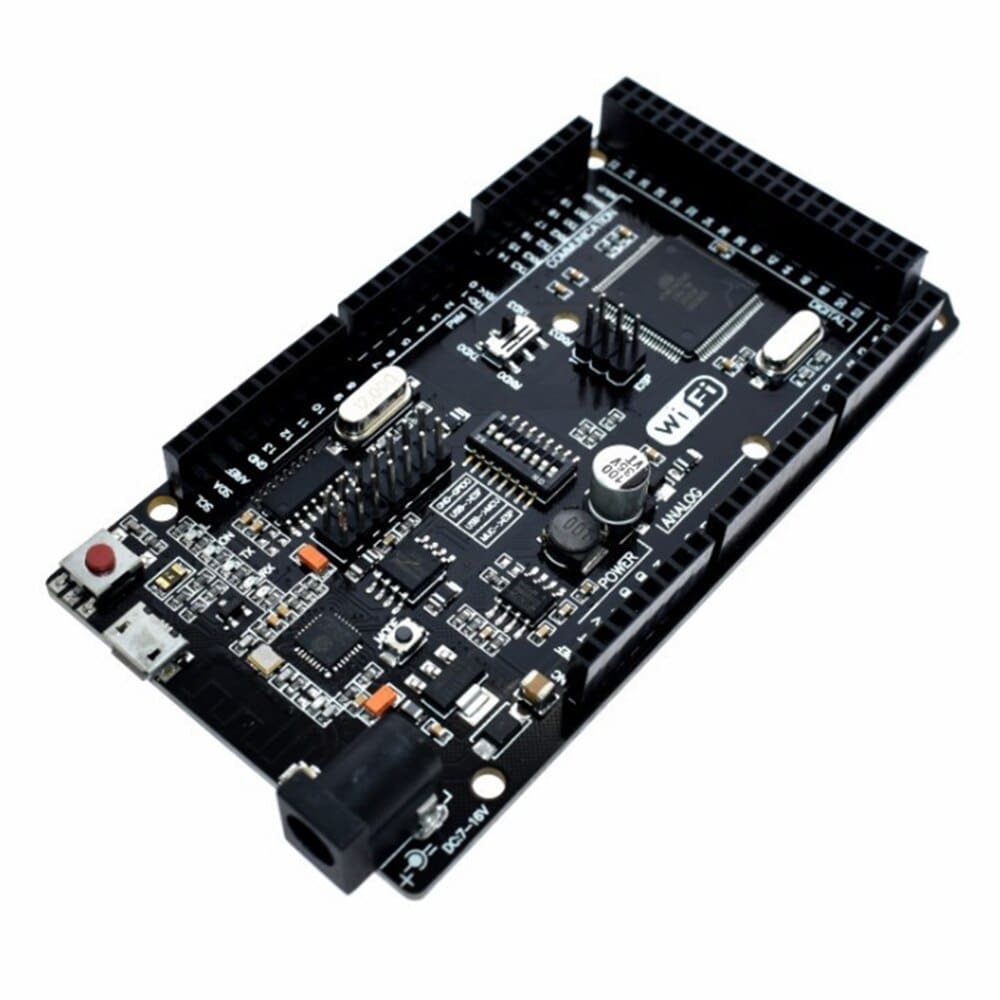
4. Mega 2560 Wi-Fi R3 Arduino Compatible
The Mega 2560 Wi-Fi R3 Arduino Compatible board combines the power of the Mega 2560 with built-in wireless connectivity. This board integrates an ESP8266 Wi-Fi module directly onto the PCB. You get internet access without buying extra shields or modules.
Why add Wi-Fi to your project? Connected devices define modern electronics. This board lets you send sensor data to cloud platforms, control devices from your phone, or build smart home systems. The onboard Wi-Fi handles network tasks while the ATmega2560 manages your main code.
The dual-processor design offers unique flexibility. The ESP8266 runs its own code independently or passes data to the main ATmega2560 chip. DIP switches on the board configure how the two processors communicate.
Perfect applications for the Wi-Fi Mega:
- IoT sensor networks
- Remote monitoring systems
- Smart home controllers
- Weather stations with web dashboards
- Wireless data loggers
- Phone-controlled robots
This board integrates well with ESP32 and ESP8266 development ecosystems. Code written for standalone ESP modules often works with modifications on this combined board.
Technical specifications:
- Main chip: ATmega2560 at 16MHz
- Wi-Fi chip: ESP8266
- Wireless: 802.11 b/g/n
- Digital I/O: 54 pins
- Analog inputs: 16
- Flash: 256KB (ATmega) + 4MB (ESP)
Connect external Wi-Fi modules if you need dual wireless interfaces. The board’s multiple serial ports support additional communication modules.
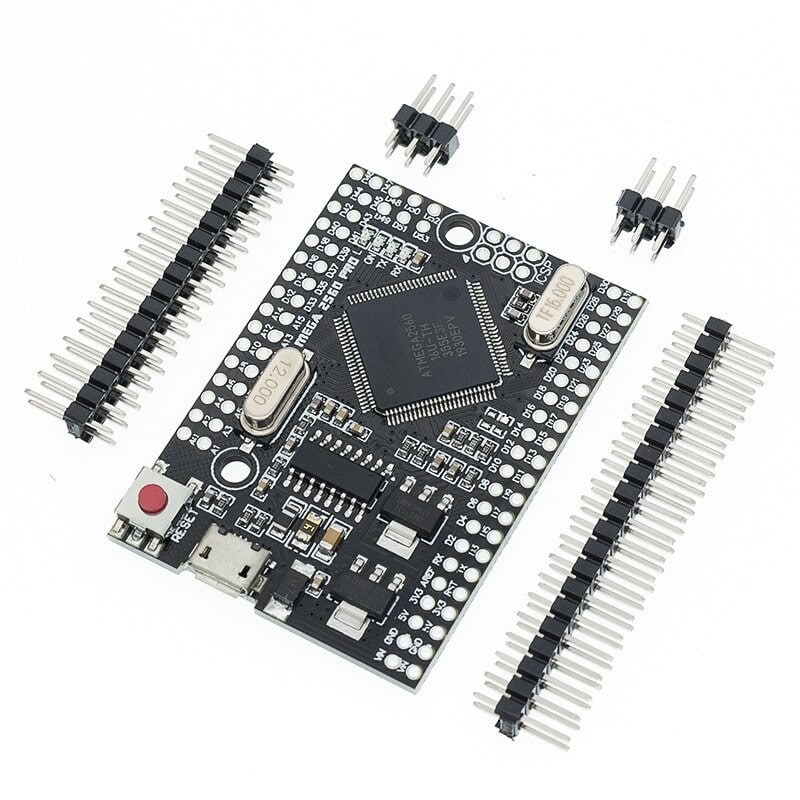
5. Arduino Mega 2560 Pro Embedded
Compactness meets power with the Arduino Mega 2560 Pro Embedded. Currently, on sale, this board is perfect for projects where space is a constraint, ensuring you don’t compromise on functionality.
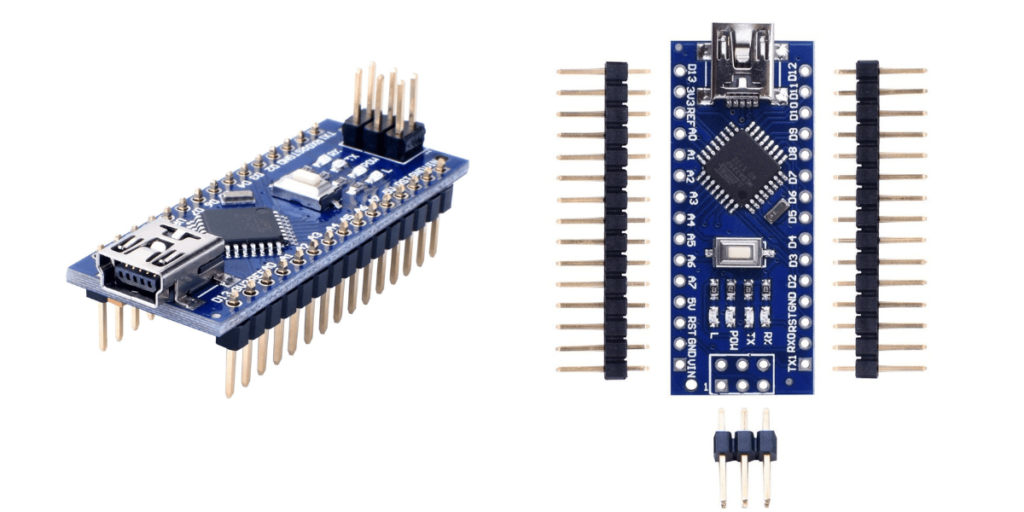
6. Arduino Nano V3.0 Compatible ATmega328P
The Arduino Nano V3.0 Compatible ATmega328P is a marvel in the world of wearable tech. Its compact design ensures your wearable projects are sleek, stylish, and efficient.
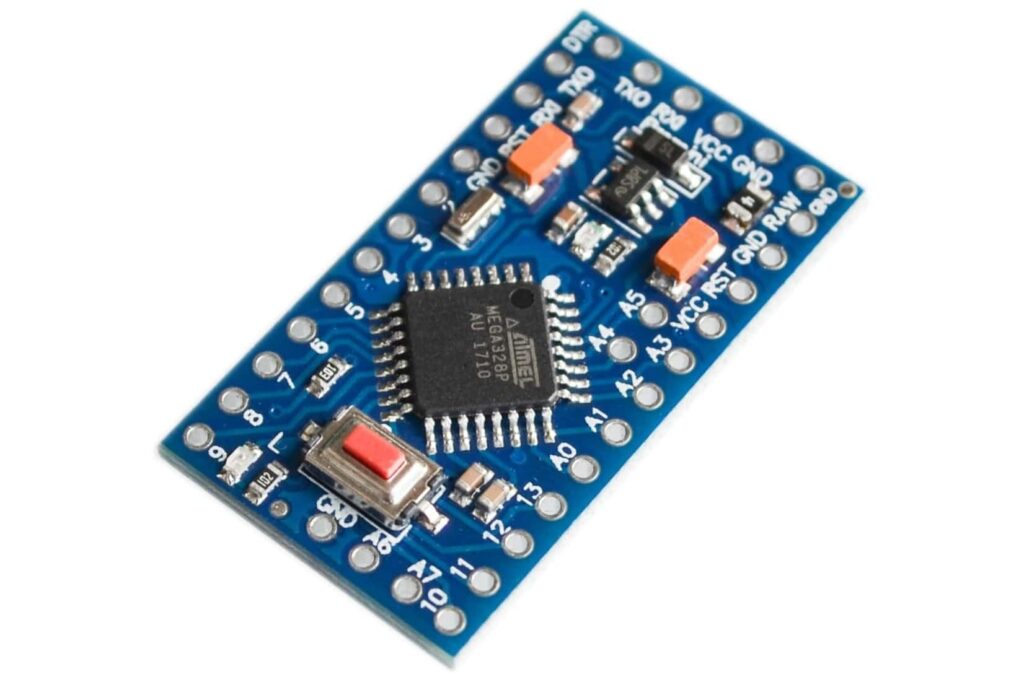
7. Pro Mini 328 Mini 3.3V/5V
The best-seller Pro Mini 328 Mini 3.3V/5V is a testament to its versatility. With its compact design and dual voltage capabilities, it’s perfect for a wide range of projects.
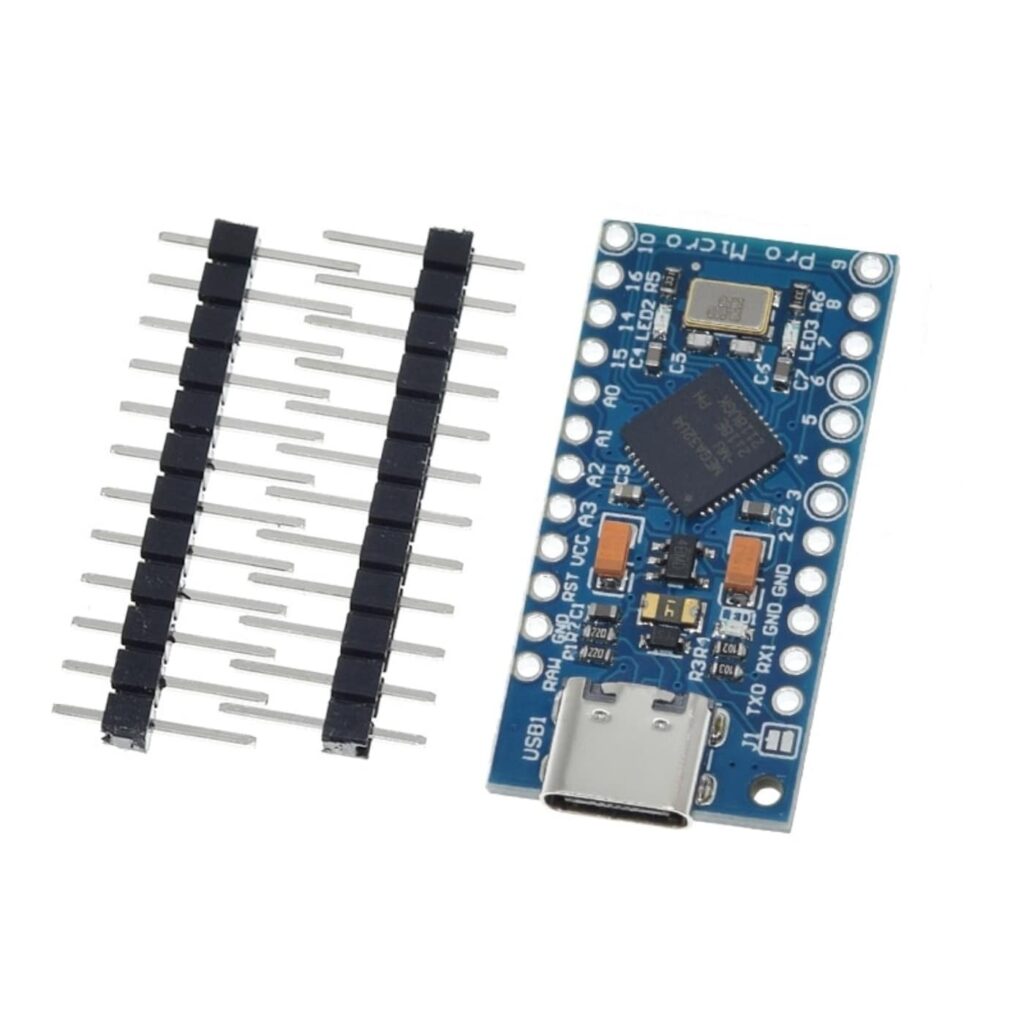
8. Type-C Pro Micro ATmega32U4
Embrace modern technology with the Type-C Pro Micro ATmega32U4. Featuring the latest Type-C connector, it ensures faster data transfer, making your projects run smoother than ever.
The beauty of Arduino lies in its open-source nature, allowing for continuous innovation and improvement. With a plethora of boards available, each tailored to specific needs, the possibilities are truly endless. Whether you’re looking to dive into the world of electronics, teach STEM concepts, prototype a product idea, or simply explore a new hobby, Arduino offers a gateway to a world of creativity and innovation.
How to Choose the Right Arduino Compatible Board
Selecting the correct board depends on your project requirements. Consider these factors before buying:
Pin count matters most. Count how many inputs and outputs your project needs. Add a few extra for future expansion. The Uno handles most projects with under 20 connections. Choose the Mega for larger builds.
Memory determines program size. The Uno’s 32KB stores moderately complex programs. Graphics, data logging, or feature-rich code may need the Mega’s 256KB. Run out of memory and your project won’t compile.
Connectivity needs shape your choice. Need internet access? The Wi-Fi Mega includes wireless built-in. For offline projects, the standard Uno or Mega costs less and works fine.
Project Type Guide
| Project Type | Recommended Board | Why |
|---|---|---|
| Learning basics | Uno | Simple, well-documented |
| Sensor monitoring | Uno R3 | Enough pins, low cost |
| Robotics | Mega 2560 | Many outputs for motors |
| IoT devices | Mega Wi-Fi | Built-in connectivity |
| LED displays | Mega 2560 | Memory for animations |
| Prototyping | Uno R3 | Fast iteration |
Arduino Boards: Overview
Getting Started With Your Arduino Compatible Board
Setting up takes just a few steps. First, download the Arduino IDE from arduino.cc. This free software runs on Windows, Mac, and Linux computers.
Step 1: Install the Arduino IDE Download and install the latest version. The software includes drivers for most compatible boards. Some boards need additional driver installation.
Step 2: Connect your board Plug the USB cable into your board and computer. The power LED should light up. Your computer recognizes the board as a serial device.
Step 3: Select your board type Open Tools > Board in the Arduino IDE. Choose “Arduino Uno” for Uno compatibles or “Arduino Mega 2560” for Mega compatibles. The IDE configures settings automatically.
Step 4: Upload your first program The IDE includes example programs. Try File > Examples > 01.Basics > Blink. Click Upload. The onboard LED blinks when the upload completes successfully.
Essential Accessories
Every Arduino project needs supporting components. Stock your workbench with these essentials:
- Soldering iron kits for permanent connections
- Breadboards and jumper wires for quick prototyping
- Digital multimeters for troubleshooting
- Electronic components like resistors and capacitors
For testing your circuits, use electronic test equipment to measure voltages and debug problems. A good multimeter prevents hours of frustration.
Powering Your Arduino Projects
Arduino boards accept power from multiple sources. USB provides 5V directly to the board. External power supplies connect through the barrel jack or VIN pin.
USB power suits most simple projects. Your computer’s USB port delivers enough current for the board plus a few LEDs or sensors. Complex projects with motors need more power.
External power expands your options. Use a 7-12V DC adapter for standalone operation. The onboard regulator drops voltage to 5V. Higher voltages waste power as heat.
Battery power creates portable projects. Lithium polymer batteries offer high capacity in small packages. Use buck converters to step down battery voltage safely.
Power Supply Options
| Source | Voltage | Best For |
|---|---|---|
| USB | 5V | Development, testing |
| DC adapter | 7-12V | Permanent installations |
| LiPo battery | 3.7V | Portable projects |
| AA batteries | 6V (4×1.5V) | Simple portable |
Need to power other devices from your Arduino? DC to DC converters adjust voltage levels safely. Boost converters step up voltage when needed.
Common Arduino Project Ideas
Start with simple projects and build complexity over time. These ideas match well with compatible boards:
Beginner Projects (Arduino Uno)
- LED traffic light simulator
- Temperature and humidity monitor
- Simple alarm systems
- Automatic plant watering
- Digital dice roller
Intermediate Projects (Uno or Mega)
- LCD weather station
- RFID door lock
- Line-following robot
- Ultrasonic distance meter
- Music playing alarm clock
Advanced Projects (Mega or Wi-Fi Mega)
- Home automation system
- 3D printer controller
- CNC machine driver
- Multi-sensor data logger
- Remote monitoring station
For robotics competitions, pair your board with the robotics competition season toolkit. Complete kits include motors, sensors, and structural components.
Arduino Compatible Boards vs Official Arduino
Both types run identical code. The differences come down to manufacturing quality, support, and price.
Official Arduino boards offer:
- Rigorous quality testing
- Direct company support
- Funding for Arduino development
- Guaranteed authentic components
Compatible boards provide:
- Lower prices (often 50-70% less)
- Same functionality
- Community support
- Good quality from reputable sellers
For learning and prototyping, compatible boards work perfectly. Professional products might specify official boards for supply chain reasons. Students and hobbyists save significantly with compatibles.
Expanding Your Arduino with Shields and Modules
Shields plug directly onto Arduino boards adding new capabilities. Motor shields drive DC motors and steppers. Sensor shields provide easy connection points. Display shields add screens and buttons.
Popular shield types:
- Motor and servo drivers
- Relay control boards
- Prototyping shields
- LCD and OLED displays
- Ethernet and Wi-Fi adapters
Browse the full range of Arduino shields to find the right expansion for your project. Most shields work with both Uno and Mega form factors.
Relay modules let Arduinos control high-voltage devices safely. Switch lights, appliances, and motors with low-voltage logic signals. Always follow proper safety practices with mains voltage.
Display Options for Arduino Projects
Visual feedback makes projects more useful. Several display types connect easily to Arduino compatible boards.
LCD character displays show text in rows and columns. The common 16×2 size displays two rows of 16 characters. I2C backpacks reduce wiring to just four connections.
OLED displays offer sharp graphics in compact sizes. These screens show images, graphs, and custom fonts. LCD and OLED displays suit wearables and portable builds.
TFT color screens display full-color graphics and photos. Larger screens need the Mega’s extra memory and pins. Touch-enabled versions add interactive control.
Sensors for Arduino Projects
Sensors let Arduino boards detect the physical world. Temperature, humidity, motion, and distance sensors connect with simple wiring.
Temperature sensors measure ambient or contact temperature. DHT11 and DHT22 modules combine temperature and humidity sensing. DS18B20 probes measure water and soil temperature.
Temperature sensors work with any Arduino board. Most use digital protocols that minimize wiring. Analog sensors need the board’s analog input pins.
Humidity sensors detect moisture in air or soil. Combined with temperature sensors, they enable weather monitoring and greenhouse automation.
Motion sensors detect movement for security and automation. Ultrasonic sensors measure distance to objects. Light sensors respond to ambient brightness levels.
Communication Options
Arduino boards communicate with other devices through several protocols:
Serial communication uses TX and RX pins for simple data transfer. Connect GPS modules, Bluetooth adapters, or other microcontrollers. The Mega’s four serial ports handle multiple connections.
I2C protocol connects sensors and displays with just two wires. Many devices share the same bus. Each device has a unique address for individual control.
SPI protocol transfers data at high speeds. SD card readers, some displays, and radio modules use SPI. The Arduino dedicates specific pins for SPI communication.
Communication boards add Bluetooth, LoRa, cellular, and other wireless options. Radio modules create mesh networks between multiple Arduinos.
Tools for Arduino Development
Building Arduino projects requires basic electronics tools. Quality tools make work easier and results more reliable.
Soldering equipment creates permanent connections. Start with a digital soldering station offering temperature control. Variable temperature helps with different components and wire gauges.
For PCB soldering, use fine-tipped irons and quality solder wire. Leaded solder wire flows easily for beginners while lead-free options meet regulations.
Measurement tools diagnose problems quickly. Digital multimeters measure voltage, current, and resistance. Handheld oscilloscopes visualize signals for advanced debugging.
Hand tools complete your workbench. Precision screwdriver sets handle tiny screws in enclosures. Wire strippers, cutters, and pliers work wires and components.
Setting Up Your Electronics Workspace
A dedicated workspace improves productivity and safety. Organize tools and components for easy access.
Essential workspace items:
- ESD-safe work mat
- Good lighting (adjustable lamp)
- Parts storage bins
- Safety glasses
- Fume extraction for soldering
Starting your first electronics lab setup? Begin with quality basics rather than many cheap tools. A good soldering station and multimeter serve for years.
For hobbyists, DIY electronics kits provide components and instructions together. Complete projects build skills progressively.
Troubleshooting Common Issues
Arduino projects sometimes behave unexpectedly. These common problems have simple solutions:
Board not recognized by computer:
- Try a different USB cable (some only charge)
- Install correct drivers for your operating system
- Check Device Manager (Windows) or System Information (Mac)
Upload fails:
- Verify correct board type selected
- Check COM port selection
- Disconnect devices using pins 0 and 1
Program compiles but doesn’t work:
- Add debug serial prints to check logic
- Verify power supply provides enough current
- Check wiring against schematic
Random resets or freezes:
- Insufficient power for motors or LEDs
- Missing decoupling capacitors
- Electrical noise from motors
Use circuit testing equipment to verify connections and signals. Systematic debugging finds problems faster than random changes.
IoT and Connected Projects
Internet of Things projects connect Arduino boards to web services and smartphones. The Wi-Fi Mega makes this especially easy.
Cloud platforms for Arduino:
- Blynk for smartphone control
- ThingSpeak for data logging
- IFTTT for automation
- MQTT brokers for device communication
For advanced IoT development, consider dedicated boards with built-in Wi-Fi or Bluetooth. ESP32 and ESP8266 modules offer more wireless features than basic Arduinos.
The Wemos D1 Mini combines Wi-Fi with Arduino compatibility in a tiny form factor. Perfect for space-constrained IoT sensors and actuators.
Conclusion
Arduino compatible boards open the world of electronics to everyone. The Arduino Uno suits beginners perfectly with its simple design and vast tutorial library. The Mega 2560 handles ambitious projects needing many connections. The Wi-Fi Mega adds internet connectivity for IoT applications.
All compatible boards run the same Arduino code as official boards. You save money while learning identical skills. Start with an Uno for basics, then upgrade to a Mega when your projects grow.
Ready to start building? Browse our complete range of Arduino compatible boards and accessories. Stock your workspace with electronics tools and begin creating today.
Check our boards and find the perfect board for your next creation!