
What Is Soldering and Why Is It Important?
Have you ever struggled with solder joints that break too easily? Are you tired of connections that fail just when you need them most? Creating strong solder joints isn’t magic – it’s a skill anyone can learn with the right techniques.
In this guide, I’ll show you exactly how to make rock-solid solder joints that last for years. Whether you’re fixing electronics, building guitar pedals, or working on DIY projects, these tips will help you create connections that won’t let you down.
Soldering is a vital technique used to create strong and reliable connections between electronic components on a circuit board. It involves melting a filler metal, called solder, which solidifies to form a mechanical and electrical bond.
What Makes a Solder Joint Strong?
A strong solder joint isn’t just about how it looks – it’s about how well it performs over time. But what exactly makes a solder joint strong?
The strength of your solder joint depends on three main things:
- Good metal-to-metal bonding – The solder must flow and create a real bond with both surfaces
- Complete coverage – The solder needs to wrap around and fill the connection completely
- Proper solidification – When it cools, the joint should be smooth and shiny, not grainy or dull
When all three of these things happen, you get a joint that’s both electrically reliable and physically strong.
Think of soldering like making a sandwich – you need the right ingredients (good solder and clean parts), proper preparation (cleaning and positioning), and the right technique (heat application and timing). Miss any of these, and your “sandwich” falls apart!
Essential Tools for Strong Solder Joints
Before we jump into technique, let’s make sure you have the right tools. Having the proper equipment makes creating strong solder joints much easier. Here’s what you’ll need:
The Basics (Must-Haves)
- Soldering iron or Soldering Station – Look for one with temperature control (25-30 watts for electronics work)
- Solder – 60/40 (tin/lead) or lead-free (more on choosing the right type later)
- Flux – Helps solder flow properly (often already inside the solder as “rosin core”)
- Wire cutters/strippers – For preparing wires
- Helping hands or vise – To hold components while you work
- Cleaning supplies – Isopropyl alcohol (91% or higher) and cotton swabs
Nice-to-Have Tools
- Solder sucker or desoldering braid – For fixing mistakes
- Heat shrink tubing – For insulating wire joints
- Digital multimeter – For testing connections
- Brass sponge – For cleaning your soldering iron tip
- Fume extractor – For safety when soldering
A quick tip from my experience: Don’t skimp on your soldering iron. A good temperature-controlled model will make your life so much easier! I wasted months struggling with a cheap iron before upgrading, and the difference was like night and day.
Four Steps to Flawless Wire Joints
Choosing the Right Solder for Strong Joints
Did you know that the type of solder you use dramatically affects the strength of your joints? Let’s break down your options:
Lead-Based vs. Lead-Free Solder
Lead-based solder (usually 60/40 tin/lead):
- Melts at a lower temperature (around 370°F/188°C)
- Flows more smoothly and wets surfaces better
- Creates shiny, strong joints more easily
- Downside: Contains lead, which is toxic (always wash hands after use)
Lead-free solder:
- Environmentally safer option
- Requires higher temperatures (around 430°F/221°C)
- Can be slightly more difficult to work with
- Often creates stronger but less flexible joints
For beginners seeking strong joints, 60/40 tin/lead solder with rosin core is often the easiest to use. However, if you’re concerned about safety, modern lead-free options with silver content work well too.
Solder Diameter Matters
Solder comes in different thicknesses:
- Thin solder (0.020-0.031″) – Great for small electronic components and PCBs
- Medium solder (0.032-0.050″) – Good for general electronics and wire joining
- Thick solder (0.062″ and up) – Better for larger connections like in amplifiers
For most home projects and electronics repairs, a medium diameter (around 0.031″) works best.
Have you ever noticed how much easier it is to make good joints with the right thickness of solder? Too thick, and you’ll put too much on; too thin, and you’ll struggle to apply enough quickly.
Preparation: The Secret to Strong Solder Joints
Here’s something many guides miss: 90% of soldering success happens before you ever heat up your iron. Proper preparation is crucial for strong solder joints.
Cleaning Surfaces
Dirt, oxidation, and oils are the enemies of strong solder joints. Before you start:
- Clean all metal surfaces with isopropyl alcohol on a cotton swab or cloth
- For stubborn oxidation, gently sand with fine-grit sandpaper or steel wool
- Handle cleaned parts by their edges to avoid transferring oils from your fingers
Remember: solder won’t stick to dirt or oxidation – it needs clean metal to bond with.
Mechanical Connection First
For wire joints especially, create a strong mechanical connection before applying solder:
- Strip about 1/2 inch (1.3 cm) of insulation from each wire
- Twist the exposed strands tightly to prevent fraying
- For wire-to-wire connections, cross the wires and twist them around each other
This technique, called a “Western Union splice,” gives your solder joint a solid foundation. The solder then reinforces this mechanical connection rather than being the only thing holding it together.
Don’t skip this step! A good mechanical connection can make the difference between a joint that fails immediately and one that lasts for decades.
Tinning Components (When Needed)
Sometimes, it helps to “tin” components before joining them:
- Apply a small amount of solder to each surface separately
- This creates a clean, solder-friendly surface
- Then join the pre-tinned surfaces together with a bit more solder
This technique works especially well for joining wires to terminals or connecting components that are hard to heat simultaneously.
The Four-Step Technique for Perfect Solder Joints
Now for the main event! Follow these four simple steps for consistently strong solder joints:
Step 1: Position and Secure
Place components in their final position before applying heat. Use helping hands, tape, or a vise to hold everything steady. Both hands should be free – one for the iron and one for the solder.
Step 2: Heat the Joint, Not the Solder
This is the #1 mistake beginners make! Always:
- Touch the soldering iron to both parts you’re joining
- Hold it there for 2-3 seconds to heat them evenly
- The parts should be hot enough to melt the solder, not the iron
Think of your soldering iron as a heat transfer tool, not a glue applicator. The connection points need to be hot enough to melt the solder themselves.
Step 3: Apply Solder to the Joint
Once the parts are hot:
- Touch the solder to the joint (not the iron)
- The solder should flow smoothly and get pulled into the connection
- Add just enough to cover the connection completely without excess blobs
How much solder is enough? For wire connections, you want to see the solder flow through and around the wires, creating a smooth, concave shape (like a little mountain valley).
Step 4: Keep Still While Cooling
After applying solder:
- Remove the solder first (but keep the iron in place for a moment)
- Then remove the iron
- Don’t move the connection until the solder has completely solidified (usually just a few seconds)
Moving the joint while the solder is cooling can create a “cold joint” which is weak and likely to fail.
How to Make Beatiful Solder Joints
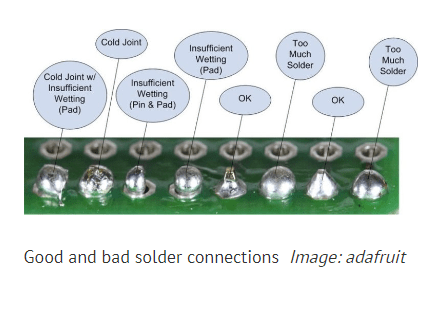
What Good and Bad Solder Joints Look Like
Learning to recognize the signs of quality solder joints helps you spot problems before they cause failures. Let’s compare:
Signs of a Strong Solder Joint
A good, strong solder joint will have:
- A smooth, shiny surface that looks like chrome or a mirror
- A concave shape (slightly curved inward)
- Complete coverage of the connection
- No cracks or gaps
- Solder that has visibly flowed onto both parts being joined
Warning Signs of Weak Joints
Watch out for these red flags:
- Dull, grainy appearance – Shows the solder didn’t flow properly (cold joint)
- Ball-shaped blobs – Indicates poor wetting of the surfaces
- Spikes or points – Can break easily and cause shorts
- Too much solder – Creates stress points and wastes material
- Too little solder – Won’t provide enough strength or conductivity
When you see these issues, it’s best to remove the solder completely and try again. Trying to “fix” a bad joint by adding more solder rarely works well.
I once spent hours troubleshooting a guitar pedal that kept cutting out, only to find a single cold solder joint was the culprit. After redoing that one connection properly, it worked perfectly for years!

YIHUA 902-Series Soldering Iron Tips
-18% Original price was: £1.90.£1.55Current price is: £1.55.Select options This product has multiple variants. The options may be chosen on the product page Quick View
900M-T Series Soldering Iron Tips
-24% Original price was: £1.90.£1.45Current price is: £1.45.Select options This product has multiple variants. The options may be chosen on the product page Quick View
C245 Cartridges Precision Soldering Tips
-40% Original price was: £9.90.£5.90Current price is: £5.90.Select options This product has multiple variants. The options may be chosen on the product page Quick View
C210 Cartridges Micro Soldering Tips I, K, SI
-40% Original price was: £9.90.£5.90Current price is: £5.90.Select options This product has multiple variants. The options may be chosen on the product page Quick View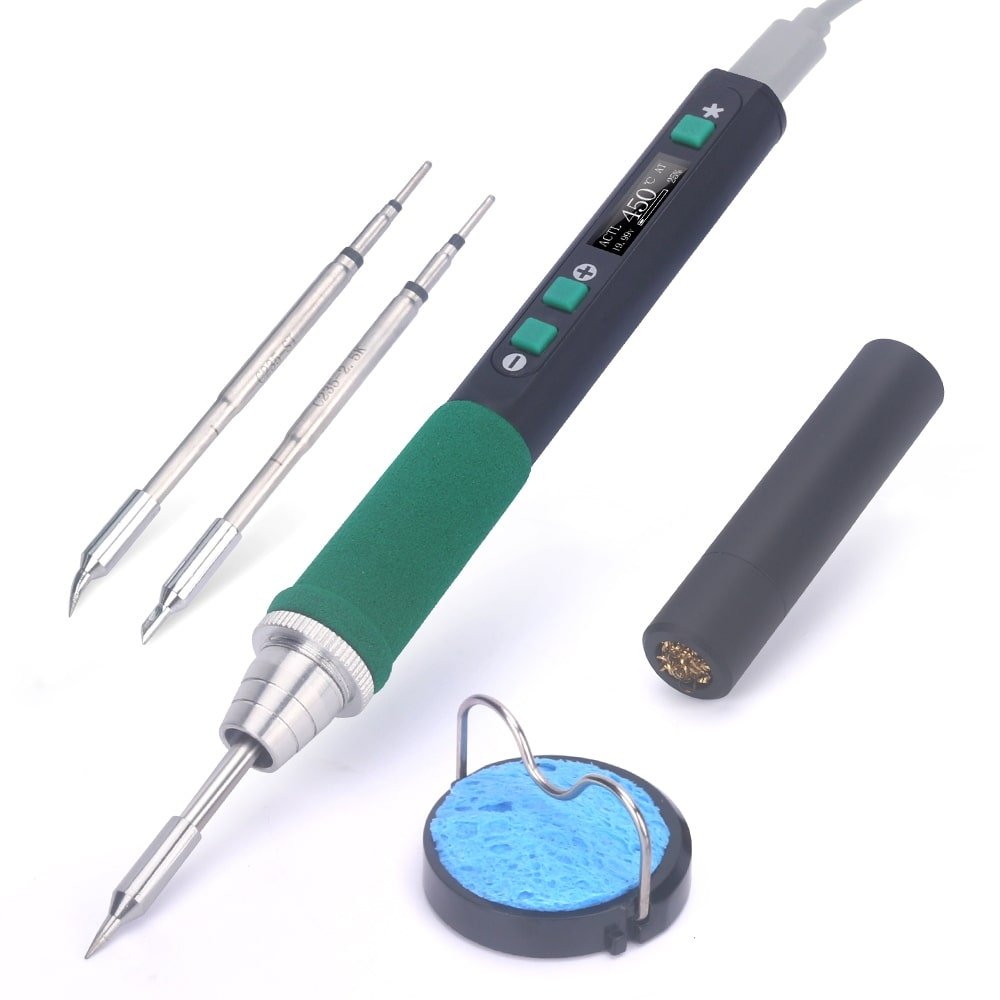
YIHUA 928D-IV USB-C Cordless Soldering Iron 60W PID Temperature Control
-42% Original price was: £59.00.£34.50Current price is: £34.50.Add to basket Quick View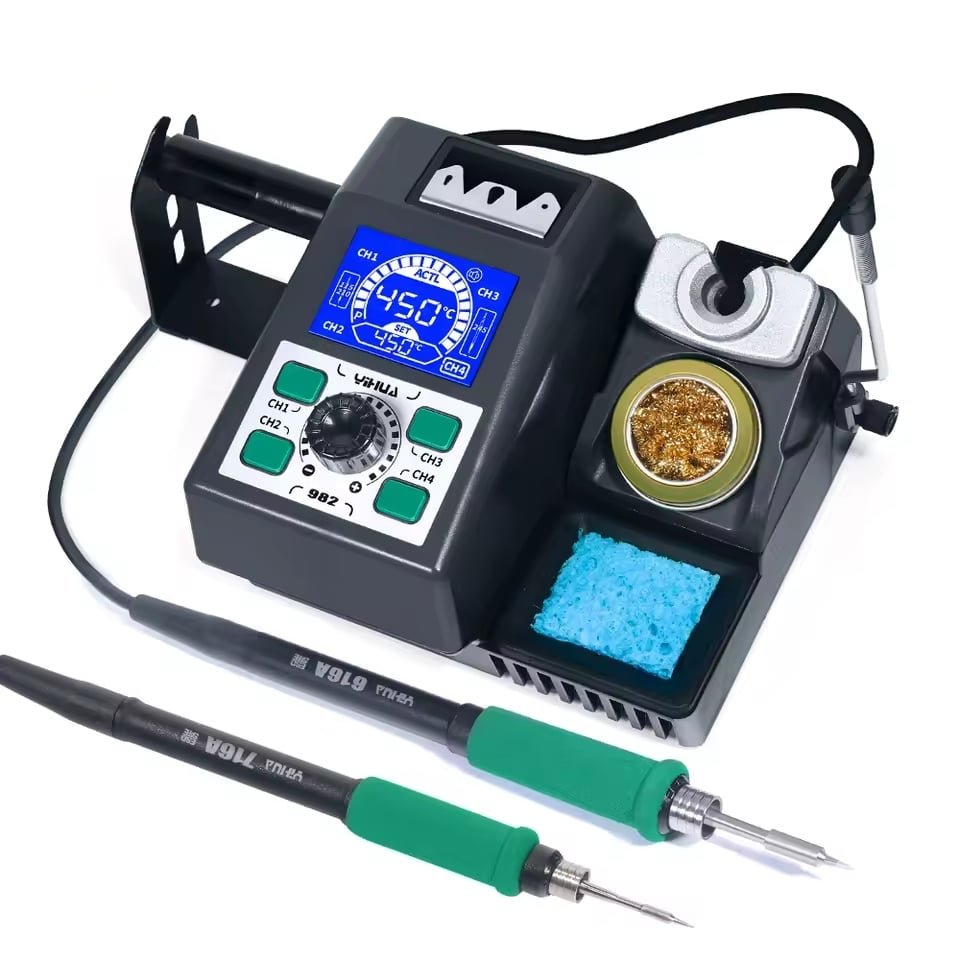
YIHUA 982 Dual-Handle Soldering Station C210/C245 - 40W-120W
-24% Original price was: £89.00.£68.00Current price is: £68.00.Add to basket Quick View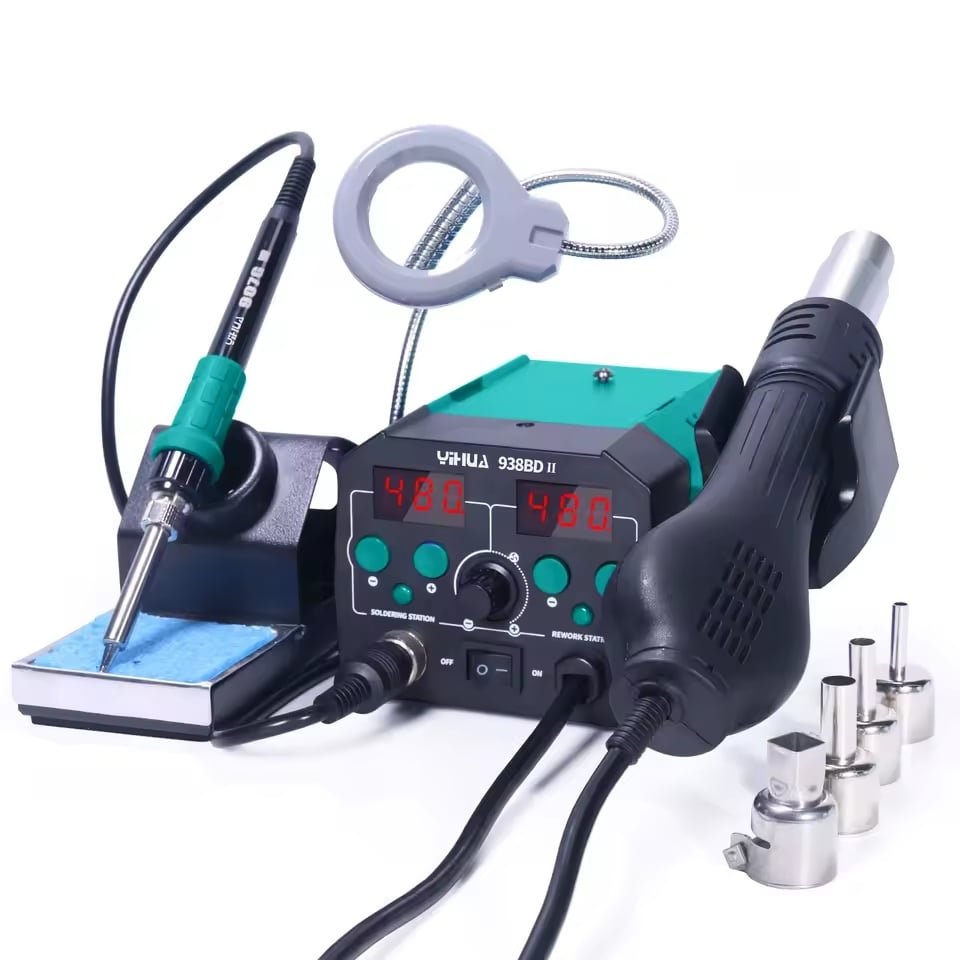
YIHUA 938BD-II 740W Digital Soldering Station Hot Air Rework + LED
-18% Original price was: £79.00.£64.50Current price is: £64.50.Add to basket Quick View
300W Heavy Duty Digital Soldering Station
-25% Original price was: £220.00.£165.00Current price is: £165.00.Add to basket Quick View
YIHUA 939D+ III EVO Soldering Stations Best for Beginners
-12% Original price was: £79.00.£69.50Current price is: £69.50.Add to basket Quick View
YIHUA 938D Hot Tweezers Soldering Station SMD - 120W PID Control
-51% Original price was: £79.00.£39.00Current price is: £39.00.Add to basket Quick View
YIHUA 926LED-IV Digital Soldering Station 90-480°C PID Control
-29% Original price was: £59.00.£41.90Current price is: £41.90.Add to basket Quick ViewCommon Problems and How to Fix Them
Even experienced solderers run into issues sometimes. Here’s how to handle common problems:
Cold Solder Joints
Problem: Joint looks dull and grainy, not shiny. Cause: Not enough heat applied to the components. Solution: Reheat the joint completely until the solder flows, then allow it to cool undisturbed.
Solder Bridges
Problem: Solder connects two points that shouldn’t be connected. Cause: Using too much solder or working in tight spaces. Solution: Use desoldering braid to remove the excess solder, then try again with less solder.
Insufficient Wetting
Problem: Solder balls up and doesn’t spread properly. Cause: Dirty surfaces or not enough flux. Solution: Clean the surfaces thoroughly and use flux if needed before trying again.
Cracked Joints
Problem: Joint develops cracks or breaks easily. Cause: Movement during cooling or mechanical stress. Solution: Remove old solder completely, secure components better, and redo the joint.
Remember, it’s always better to completely remove a bad joint and start fresh rather than trying to add more solder to fix it.
Special Techniques for Different Applications
Different soldering tasks require slightly different approaches. Here are techniques for specific situations:
Wire-to-Wire Connections
For the strongest wire connections:
- Strip and twist each wire end
- Cross the wires and wrap each around the other (Western Union splice)
- Heat both wires with the iron
- Apply solder until it flows through the twisted section
- Allow to cool completely before moving
- Add heat shrink tubing for insulation and additional strength
Component-to-Board Connections
When soldering components to circuit boards:
- Insert component leads through the holes
- Bend leads slightly on the underside to hold the component in place
- Touch iron to both the pad and the lead for 2-3 seconds
- Apply solder to the joint (not the iron)
- Use just enough solder to form a small cone shape
- Trim excess lead length after the joint cools
Surface Mount Components
For tiny surface mount components:
- Apply a small amount of solder paste or flux to the board pads
- Position the component precisely
- Touch one end with the iron to tack it in place
- Solder each connection individually
- Use a fine-tipped iron and thin solder
Advanced Tips for Extra-Strong Joints
Ready to take your soldering skills to the next level? These advanced techniques create even stronger connections:
Using Additional Flux
While most solder has a flux core, adding extra flux can help with difficult connections:
- Apply a small amount of flux to the joint before soldering
- This helps the solder flow more completely
- Clean any residue afterward with isopropyl alcohol
Temperature Control
Matching your iron’s temperature to your project improves joint strength:
- Lead-based solder: 600-650°F (315-343°C)
- Lead-free solder: 650-700°F (343-371°C)
- Delicate components: Use the lower end of the range
- Large connections: Use the higher end of the range
The “Heat Sink” Technique
When soldering heat-sensitive components:
- Attach alligator clips to component leads between the joint and the component
- The clips absorb excess heat, protecting delicate parts
- Remove the clips after the joint cools
Pre-Tinning Technique
For the strongest connections:
- Apply a small amount of solder to each surface separately (tinning)
- Join the pre-tinned surfaces
- Heat the joint until the solder flows together
- Add a bit more solder if needed for complete coverage
Safety Tips When Soldering
Working safely is just as important as creating strong joints:
- Ventilation: Always work in a well-ventilated area or use a fume extractor
- Eye protection: Wear safety glasses to protect against solder splatter
- Hand washing: Wash hands thoroughly after handling solder, especially lead-based types
- Fire safety: Use a proper soldering stand and keep flammable materials away
- Burns: Treat the iron as if it’s always hot – it only takes a fraction of a second to cause a burn
A personal tip: Keep a small container of water nearby. If you accidentally touch the hot iron, immediately plunge your finger into the water for quick relief.
Testing Your Solder Joints
How do you know if your solder joint is truly strong? Try these simple tests:
Visual Inspection
First, look carefully at the joint under good lighting:
- Is it shiny (not dull)?
- Does it make a complete connection?
- Is the shape smooth and concave?
- Is there no excess solder or spikes?
Mechanical Testing
For non-critical joints, you can physically test them:
- Gently tug on the connection
- Apply light pressure from different angles
- The joint shouldn’t move or crack
Electrical Testing
For electronic connections:
- Use a multimeter’s continuity test function
- Touch the probes to either side of the connection
- You should hear a beep indicating good conductivity
- For precision, use the resistance function – a good joint shows near-zero ohms
Never skip testing critical connections! I once spent hours debugging a project only to find that a joint that looked perfect visually had no electrical connection at all.
Maintaining Your Soldering Equipment
Your tools directly affect your solder joint quality. Keep them in top shape:
Soldering Iron Tip Care
- Always clean the tip before and after use
- “Tin” the tip when finished by applying a small amount of fresh solder
- Never file or sand the tip – this damages the protective plating
- Replace the tip when it no longer accepts solder easily
Proper Storage
- Store solder in a cool, dry place
- Keep flux in sealed containers
- Clean all tools before putting them away
- Avoid dropping or banging your soldering iron
Taking care of your tools means they’ll take care of your projects!
Real-World Examples: Learning From Success and Failure
I’ve made thousands of solder joints over the years – some great, some terrible. Here are real lessons I’ve learned:
The Guitar Pedal That Failed on Stage
A friend built a custom guitar pedal with what looked like decent solder joints. But during a performance, it suddenly stopped working! The problem? A single joint that hadn’t been heated enough, creating a “cold” connection that broke under the vibration of the performance.
The lesson: Always heat components thoroughly and check every joint, especially for equipment that will face physical stress.
The Repair That Outlasted the Original
I once repaired a vintage amplifier where the original factory solder joints had failed after 30 years. My properly made replacement joints are still going strong 15 years later – outlasting the originals!
The lesson: Taking extra time to create proper joints pays off with decades of reliability.
Conclusion: Key Takeaways for Strong Solder Joints
Creating strong solder joints isn’t complicated once you understand the basics. To recap the most important points:
- Clean thoroughly – Solder won’t bond to dirty or oxidized surfaces
- Heat the joint, not the solder – Let the connection melt the solder
- Use the right amount – Not too much, not too little
- Stay still while cooling – Movement creates weak joints
- Inspect your work – Learn to recognize good and bad joints
Follow these simple principles, and you’ll create connections that stay strong for years to come.
Action Steps to Improve Your Soldering Today
Ready to create better solder joints starting now? Take these actions:
- Clean your iron tip and tin it properly
- Practice on some scrap wire before working on important projects
- Examine your joints under magnification to learn what good ones look like
- Test connections both visually and electrically
- Be patient – rushing is the enemy of strong solder joints
Remember, soldering is a skill that improves with practice. Each joint you make teaches you something new!